show code block

2017年3月13日 星期一

設計模式 ─ 乾淨的程式碼

前言:

設計模式到底重要在哪?

重要在要讓別人看得懂!方便之後別人接妳程式碼的時候陣痛期可以比較短。

重要在讓自己看得懂!一段時間之後回來維護,能減少很多不必要的困擾。


實作:

大部分的程式碼實作都會發生在onCreate內,這時候

最常見的作法是依功能來判別,把所有的功能都集中在一個方法內。

@Overrideprotected void onCreate(Bundle savedInstanceState) {
    super.onCreate(savedInstanceState);    
      setContentView(R.layout.activity_main);    
       mContext = this;    
       initView(); //設定View  (Eg:findViewById)    
       initSet(); //設定功能 (Eg:setAdapter)    
       initListener(); //設定點擊 (eg:onClick)
}

最淺顯易懂的方式,完全維持OnCreate的乾淨俐落

以後要維護或是讓別人接妳程式碼的時候,可以依功能下去查找你這行到底是在幹嘛的

設計模式之王 - MVC


省小麻煩,惹大麻煩。

隨手一寫,養成好習慣。


2017年3月9日 星期四

Android元件 ─ 第一次進入app的引導畫面

前言:


如何讓一個畫面只有首次進入app的時候開啟。
今日實作影片:


你必須先看過如何儲存資料:http://nikeru8.blogspot.tw/2017/02/androidsharedpreferences.html

然後我們直接用 boolean來判斷是否第一次進入。
如果是第一次設定成True
然後在下面把boolean直設定成false
儲存這個設定!
完成!
夠簡單吧。


大部分的內容都寫在如何儲存資料內了,這邊就不再贅述
以下是我完整的程式碼:


完整程式碼:

activity_main.xml

<?xml version="1.0" encoding="utf-8"?>
<RelativeLayout xmlns:android="http://schemas.android.com/apk/res/android"
    xmlns:tools="http://schemas.android.com/tools"
    android:id="@+id/activity_main"
    android:layout_width="match_parent"
    android:layout_height="match_parent"
    android:paddingBottom="@dimen/activity_vertical_margin"
    android:paddingLeft="@dimen/activity_horizontal_margin"
    android:paddingRight="@dimen/activity_horizontal_margin"
    android:paddingTop="@dimen/activity_vertical_margin"
    tools:context="com.chat.a015865.firstwork.MainActivity">

    <TextView
        android:layout_width="wrap_content"
        android:layout_height="wrap_content"
        android:text="Hello World!" />
</RelativeLayout>


MainActivity.java


public class MainActivity extends AppCompatActivity {

    private SharedPreferences mSharedPreferences;
    private boolean firstOpenApp = true;
    private static final String DATA = "DATA";

    @Override
    protected void onCreate(Bundle savedInstanceState) {
        super.onCreate(savedInstanceState);
        setContentView(R.layout.activity_main);
        mSharedPreferences = getSharedPreferences(DATA, MODE_PRIVATE);
        readData();
        CheckFirstIn();
    }

    private void readData() {//讀取
        firstOpenApp = mSharedPreferences.getBoolean("Open", firstOpenApp);
    }

    private void saveData() {//儲存
        mSharedPreferences.edit()
                .putBoolean("Open", false)
                .apply();
    }

    private void CheckFirstIn() {
        if (firstOpenApp) {
            new AlertDialog.Builder(this)
                    .setMessage("這是第一次開啟App")
                    .setPositiveButton("確定進入", new DialogInterface.OnClickListener() {
                        @Override
                        public void onClick(DialogInterface dialogInterface, int i) {
                            dialogInterface.dismiss();//關閉Dialog
                        }
                    }).show();
            firstOpenApp = false;
        }
    }

    @Override
    protected void onPause() {//在onPause內儲存
        super.onPause();
        saveData();
    }
}


影片內有用到的功能:

Dialog: http://nikeru8.blogspot.tw/2016/07/androiddialog-button.html

Demo: https://drive.google.com/open?id=0Byk75IYx-dKXRU44Tk1jNGdlVzQ


third-party元件 ─ 網路下載圖片比較和簡易使用Fresco、Picasso 、Glide、ImageLoader

前言:

這幾天遇到OOM問題。
情況大概就是RecyclerView裡面跑大量的ImageView,導致崩潰。
RecyclerView我是寫在Fragment上面的,一開始我以為是因為Fragment沒有做好回收導致重複創建。

後來找到的問題,原來是網路下載圖片(ImageLoader)的方式緩存沒有做到釋放。
我更換了一下我讀取網路上圖片的的第三方,使用了Picasso發現問題就迎刃而解了!!

問了一下大家才發現如果對處理執行緒(Thread)不熟的話,不太推使用ImageLoader,它有一堆Leak的問題。
迷之聲:TMD緩存方式寫得天花亂墜的還不是一堆Leak


Android是比較推薦使用GlidePicasso


GlidePicasso
使用起來其實大同小異。
在這邊大致上介紹一下使用方式:


重點程式碼:
build.gradle(Module:app)

Picasso
免不了的import
compile 'com.squareup.picasso:picasso:2.5.2'

使用方式:
Picasso.with(context)
.load("http://i.imgur.com/DvpvklR.png")
.into(imageView);


Glide
免不了的import
compile 'com.github.bumptech.glide:glide:3.7.0'

使用方式:
Glide.with(context)
        .load(url)
        .into(imageView);


兩個第三方很像吧,是不是都簡單的不要不要的!


Fresco
Frescofacebook自己釋出的圖片下載第三方,你自己一定體驗過facebook它們寫的app雖然用到大量的圖片,但卻不會有卡頓、Crash掉的問題,你就知道Fresco有多麼的強大了!

推薦使用:
Glide > Picasso > Fresco > ImageLoader
當然這是比較主觀的推薦,也須依你當下的需求來使用。
如果圖片量不大,個人覺得Picasso是首選,因為他比較瘦。
當你的App內有大量的圖片需要處理,首選就會是Fresco


我擷取它人一段文章讓你參考:

Picasso所能實現的功能Glide都能做到,只是所需設置不同。兩者的區別是PicassoGlide體積小很多且圖像質量比Glide高,但Glide的速度比Picasso更快,Glide的長處是處理大型的圖片流,如gifvideo,如果要製作視頻類應用,Glide當為首選。
Fresco
可以說是綜合了之前圖片加載庫的優點,其在5.0以下的內存優化非常好,但它的不足是體積太大,按體積進行比較:Fresco>Glide>Picasso,所以Fresco在圖片較多的應用中更能凸顯其價值,如果應用沒有太多圖片需求,不推薦使用Fresco


文獻:


2017年3月1日 星期三

Android元件(WebView) ─ 內崁網路瀏覽器、和webView做溝通

前言:


讓網頁上的網路像是你自己的App一樣!

內崁式,很多公司因為懶得寫雙平台,會直接使用Mobile Web的方式直接在雙平台IOS和Android內崁WebView,但因為是內崁的,會造成使用者在使用上不流暢
會有不太好的使用者體驗。
這邊用臉書網址當作示範


重點程式碼:

想看webView有什麼東西可以用可以查原始文件內的Public mothed
https://developer.android.com/reference/android/webkit/WebView.html

可以直接複製貼在OnCreate內
//1、先設定元件findViewById
 WebView  mWebView = (WebView) findViewById(R.id.webview);

//2、這是設定內崁,沒有這一行系統會直接呼叫出瀏覽器開啟你指定的網址
mWebView.setWebViewClient(mWebViewClient);

//3、Setting對WebView做設定,以下是我常用的WebView設定,我就直接複製上來了
 WebSettings websettings = mWebView.getSettings();
       websettings.setSupportZoom(true); //啟用內置的縮放功能
       websettings.setBuiltInZoomControls(true);//啟用內置的縮放功能
       websettings.setDisplayZoomControls(false);//讓縮放功能的Button消失
       websettings.setJavaScriptEnabled(true);//使用JavaScript
       websettings.setAppCacheEnabled(true);//設置啟動緩存
       websettings.setSaveFormData(true);//設置儲存
       websettings.setAllowFileAccess(true);//啟用webview訪問文件數據
       websettings.setDomStorageEnabled(true);//啟用儲存數據
//4、loadUrl讀取網頁String
mWebView.loadUrl("http://nikeru8.blogspot.tw/");


很簡單吧!


完整程式碼:

activity_main.xml


<?xml version="1.0" encoding="utf-8"?>
<RelativeLayout xmlns:android="http://schemas.android.com/apk/res/android"
    xmlns:tools="http://schemas.android.com/tools"
    android:id="@+id/activity_main"
    android:layout_width="match_parent"
    android:layout_height="match_parent"
    tools:context="com.chat.a015865.webview.MainActivity">

    <WebView
        android:id="@+id/webview_show"
        android:layout_width="match_parent"
        android:layout_height="match_parent"/>
</RelativeLayout>


MainActivity.java


public class MainActivity extends AppCompatActivity {

    private WebView mWebView;

    @Override
    protected void onCreate(Bundle savedInstanceState) {
        super.onCreate(savedInstanceState);
        setContentView(R.layout.activity_main);
        mWebView=(WebView)findViewById(R.id.webview_show);
        WebSettings websettings = mWebView.getSettings();
        websettings.setSupportZoom(true);
        websettings.setBuiltInZoomControls(true);
        websettings.setDisplayZoomControls(false);
        websettings.setJavaScriptEnabled(true);
        websettings.setAppCacheEnabled(true);
        websettings.setSaveFormData(true);
        websettings.setAllowFileAccess(true);
        websettings.setDomStorageEnabled(true);
        mWebView.setWebViewClient(new WebViewClient());

        mWebView.loadUrl("http://nikeru8.blogspot.tw/");
    }
}


需要注意的部分:

loadUrl內的網址不可以是:www.google.com   
請給https://www.google.com.tw/


 (補充:2017/09/15)兩件事情

一、 網頁沒彈出應該彈出的Dialog?

webView.setWebChromeClient(new WebChromeClient());

如果你的webView裡面有個按鈕點下去應該彈出網頁那種Dialog 。但是消失了!?
這行可以救你。

二、如何和webView做溝通?


 WebViewClient mWebViewClient = new WebViewClient() {

        @Override
        public boolean shouldOverrideUrlLoading(WebView view, String url) {
            Log.d("CHECK URL", "url= " + url);
            
            return true;
        }

        @Override
        public void onPageFinished(WebView view, String url) {
            // TODO Auto-generated method stub
            super.onPageFinished(view, url);
        }
    };
 
shouldOverrideUrlLoading內的url是你現在webView的網址
你可以使用string.contains來抓取網址內的關鍵字。
舉個例子在shouldOverrideUrlLoading內,使用url如果url內有Login的字眼,可以直接跳轉到你自己App內的登入頁面
登入完成後,在使用onActivityResult和webview做溝通。
if (url.contains("Login")){
    //TODO  轉到你自己寫的登入頁面}

三、開啟facebook live的方式

http://nikeru8.blogspot.tw/2017/09/androidwebview-webviewufacebook.html

Demo:

https://drive.google.com/open?id=0Byk75IYx-dKXVWJkQnlSSUp5VDQ


檢查是否有網路連線 - Connectivity Network

前言:


影片中的Dialog請參考朝狀結構篇:
http://nikeru8.blogspot.tw/2016/07/androiddialog-button.html

影片中WebView:
http://nikeru8.blogspot.tw/2017/03/android.html

如果你在App內有崁入WebView,當沒有網路的情況下,會讓畫面變得很醜。

此時你可以先檢查是否有網路,在執行webView。


重點程式碼:

 
ConnectivityManager mConnectivityManager = (ConnectivityManager) getSystemService(Context.CONNECTIVITY_SERVICE);
NetworkInfo mNetworkInfo = mConnectivityManager.getActiveNetworkInfo();


上面這兩行的作用有點像是FindViewById,指定元件。
ConnectivityManager 獲取Service內的資訊
NetworkInfo 在ConnectivityManager內獲取關於網路的資訊

之後就可以在NetworkInfo內調用你想要查詢的方法。
可以去看官方文檔案內的Public mothed:https://developer.android.com/reference/android/net/NetworkInfo.html

在這列出幾個比較常用的

            //網路是否已連線
            mNetworkInfo.isConnected();
       
            //網路連線方式名稱
            mNetworkInfo.getTypeName();
            //網路狀態
            mNetworkInfo.getState();
         
            //網路是否可使用
            mNetworkInfo.isAvailable();
       
            //網路是否已連接or連線中
            mNetworkInfo.isConnectedOrConnecting();
         
            //網路失敗回報
            mNetworkInfo.isFailover();
     
            //網路是否在漫遊模式
            mNetworkInfo.isRoaming();
         
            //網路詳細狀態
            mNetworkInfo.getDetailedState();
       
            //網路狀態詳細資訊
            mNetworkInfo.getExtraInfo();
     
            //網路出錯時的原因回報:
            mNetworkInfo.getReason();


完整程式碼:

activity_main.xml


<?xml version="1.0" encoding="utf-8"?>
<LinearLayout xmlns:android="http://schemas.android.com/apk/res/android"
    xmlns:tools="http://schemas.android.com/tools"
    android:id="@+id/activity_main"
    android:layout_width="match_parent"
    android:layout_height="match_parent"
    android:orientation="vertical"
    android:paddingBottom="@dimen/activity_vertical_margin"
    android:paddingLeft="@dimen/activity_horizontal_margin"
    android:paddingRight="@dimen/activity_horizontal_margin"
    android:paddingTop="@dimen/activity_vertical_margin"
    tools:context="com.chat.a015865.checkinternet.MainActivity">

    <LinearLayout
        android:id="@+id/line_one"
        android:layout_width="match_parent"
        android:layout_height="wrap_content"
        android:layout_margin="5dp"
        android:orientation="horizontal">

        <TextView
            android:layout_width="wrap_content"
            android:layout_height="wrap_content"
            android:text="有無網路連線:"
            android:textColor="@android:color/black" />

        <TextView
            android:id="@+id/text_one"
            android:layout_width="wrap_content"
            android:layout_height="wrap_content"
            android:layout_marginLeft="5dp"
            android:text=":xx" />
    </LinearLayout>

    <LinearLayout
        android:id="@+id/line_two"
        android:layout_width="match_parent"
        android:layout_height="wrap_content"
        android:layout_margin="5dp"
        android:orientation="horizontal">

        <TextView
            android:layout_width="wrap_content"
            android:layout_height="wrap_content"
            android:text="網路連線的名稱:"
            android:textColor="@android:color/black" />

        <TextView
            android:id="@+id/text_two"
            android:layout_width="wrap_content"
            android:layout_height="wrap_content"
            android:layout_marginLeft="5dp"
            android:text=":xx" />
    </LinearLayout>

    <LinearLayout
        android:id="@+id/line_three"
        android:layout_width="match_parent"
        android:layout_height="wrap_content"
        android:layout_margin="5dp"
        android:orientation="horizontal">

        <TextView
            android:layout_width="wrap_content"
            android:layout_height="wrap_content"
            android:text="網路連線狀態:"
            android:textColor="@android:color/black" />

        <TextView
            android:id="@+id/text_three"
            android:layout_width="wrap_content"
            android:layout_height="wrap_content"
            android:layout_marginLeft="5dp"
            android:text=":xx" />
    </LinearLayout>

    <LinearLayout
        android:id="@+id/line_four"
        android:layout_width="match_parent"
        android:layout_height="wrap_content"
        android:layout_margin="5dp"
        android:orientation="horizontal">

        <TextView
            android:layout_width="wrap_content"
            android:layout_height="wrap_content"
            android:text="網路是否可使用:"
            android:textColor="@android:color/black" />

        <TextView
            android:id="@+id/text_four"
            android:layout_width="wrap_content"
            android:layout_height="wrap_content"
            android:layout_marginLeft="5dp"
            android:text=":xx" />
    </LinearLayout>

    <LinearLayout
        android:id="@+id/line_five"
        android:layout_width="match_parent"
        android:layout_height="wrap_content"
        android:layout_margin="5dp"
        android:orientation="horizontal">

        <TextView
            android:layout_width="wrap_content"
            android:layout_height="wrap_content"
            android:text="網路是否已連接or連線中:"
            android:textColor="@android:color/black" />

        <TextView
            android:id="@+id/text_five"
            android:layout_width="wrap_content"
            android:layout_height="wrap_content"
            android:layout_marginLeft="5dp"
            android:text=":xx" />
    </LinearLayout>

    <LinearLayout
        android:id="@+id/line_six"
        android:layout_width="match_parent"
        android:layout_height="wrap_content"
        android:layout_margin="5dp"
        android:orientation="horizontal">

        <TextView
            android:layout_width="wrap_content"
            android:layout_height="wrap_content"
            android:text="網路是否故障有問題:"
            android:textColor="@android:color/black" />

        <TextView
            android:id="@+id/text_six"
            android:layout_width="wrap_content"
            android:layout_height="wrap_content"
            android:layout_marginLeft="5dp"
            android:text=":xx" />
    </LinearLayout>

    <LinearLayout
        android:id="@+id/line_seven"
        android:layout_width="match_parent"
        android:layout_height="wrap_content"
        android:layout_margin="5dp"
        android:orientation="horizontal">

        <TextView
            android:layout_width="wrap_content"
            android:layout_height="wrap_content"
            android:text="網路是否在漫遊模式:"
            android:textColor="@android:color/black" />

        <TextView
            android:id="@+id/text_seven"
            android:layout_width="wrap_content"
            android:layout_height="wrap_content"
            android:layout_marginLeft="5dp"
            android:text=":xx" />
    </LinearLayout>
    <LinearLayout
        android:id="@+id/line_eight"
        android:layout_width="match_parent"
        android:layout_height="wrap_content"
        android:layout_margin="5dp"
        android:orientation="horizontal">

        <TextView
            android:layout_width="wrap_content"
            android:layout_height="wrap_content"
            android:text="網路詳細狀態:"
            android:textColor="@android:color/black" />

        <TextView
            android:id="@+id/text_eight"
            android:layout_width="wrap_content"
            android:layout_height="wrap_content"
            android:layout_marginLeft="5dp"
            android:text=":xx" />
    </LinearLayout>
    <LinearLayout
        android:layout_width="match_parent"
        android:layout_height="wrap_content"
        android:layout_margin="5dp"
        android:orientation="horizontal">

        <TextView
            android:layout_width="wrap_content"
            android:layout_height="wrap_content"
            android:text="網路狀態詳細資訊:"
            android:textColor="@android:color/black" />

        <TextView
            android:id="@+id/text_night"
            android:layout_width="wrap_content"
            android:layout_height="wrap_content"
            android:layout_marginLeft="5dp"
            android:text=":xx" />
    </LinearLayout>
    <LinearLayout
        android:layout_width="match_parent"
        android:layout_height="wrap_content"
        android:layout_margin="5dp"
        android:orientation="horizontal">

        <TextView
            android:layout_width="wrap_content"
            android:layout_height="wrap_content"
            android:text="網路出錯時的原因回報:"
            android:textColor="@android:color/black" />

        <TextView
            android:id="@+id/text_ten"
            android:layout_width="wrap_content"
            android:layout_height="wrap_content"
            android:layout_marginLeft="5dp"
            android:text=":xx" />
    </LinearLayout>

    <WebView
        android:id="@+id/webview_show"
        android:layout_width="match_parent"
        android:layout_height="match_parent"/>
</LinearLayout>


MainActivity.java

public class MainActivity extends AppCompatActivity {

    private TextView mTextTen, mTextNight, mTextEight, mTextOne, mTextTwo, mTextThree, mTextFour, mTextFive, mTextSix, mTextSeven;
    private Context context;
    private WebView mWebView;

    @Override
    protected void onCreate(Bundle savedInstanceState) {
        super.onCreate(savedInstanceState);
        setContentView(R.layout.activity_main);
        context = this;
        initView();
        checkNetWork();
        initSet();

    }

    private void initView() {
        mWebView = (WebView) findViewById(R.id.webview_show);
        mTextOne = (TextView) findViewById(R.id.text_one);
        mTextTwo = (TextView) findViewById(R.id.text_two);
        mTextThree = (TextView) findViewById(R.id.text_three);
        mTextFour = (TextView) findViewById(R.id.text_four);
        mTextFive = (TextView) findViewById(R.id.text_five);
        mTextSix = (TextView) findViewById(R.id.text_six);
        mTextSeven = (TextView) findViewById(R.id.text_seven);
        mTextEight = (TextView) findViewById(R.id.text_eight);
        mTextNight = (TextView) findViewById(R.id.text_night);
        mTextTen = (TextView) findViewById(R.id.text_ten);
    }

    private void initSet() {

        mWebView.setWebViewClient(new WebViewClient());
        WebSettings websettings = mWebView.getSettings();
        websettings.setSupportZoom(true);
        websettings.setBuiltInZoomControls(true);
        websettings.setDisplayZoomControls(false);
        websettings.setJavaScriptEnabled(true);
        websettings.setAppCacheEnabled(true);
        websettings.setSaveFormData(true);
        websettings.setAllowFileAccess(true);
        websettings.setDomStorageEnabled(true);
        
    }

    private void checkNetWork() {
        ConnectivityManager mConnectivityManager =
                (ConnectivityManager) getSystemService(Context.CONNECTIVITY_SERVICE);
        NetworkInfo mNetworkInfo = mConnectivityManager.getActiveNetworkInfo();

        if (mNetworkInfo != null) {
            //網路是否已連線
            mNetworkInfo.isConnected();
            mTextOne.setText("" + mNetworkInfo.isConnected());
            //網路連線方式名稱
            mNetworkInfo.getTypeName();
            mTextTwo.setText("" + mNetworkInfo.getTypeName());
            //網路連線狀態
            mNetworkInfo.getState();
            mTextThree.setText("" + mNetworkInfo.getState());
            //網路是否可使用
            mNetworkInfo.isAvailable();
            mTextFour.setText("" + mNetworkInfo.isAvailable());
            //網路是否已連接or連線中
            mNetworkInfo.isConnectedOrConnecting();
            mTextFive.setText("" + mNetworkInfo.isConnectedOrConnecting());
            //網路是否故障有問題
            mNetworkInfo.isFailover();
            mTextSix.setText("" + mNetworkInfo.isFailover());
            //網路是否在漫遊模式
            mNetworkInfo.isRoaming();
            mTextSeven.setText("" + mNetworkInfo.isRoaming());
            //網路詳細狀態
            mNetworkInfo.getDetailedState();
            mTextEight.setText("" + mNetworkInfo.getDetailedState());
            //網路狀態詳細資訊
            mNetworkInfo.getExtraInfo();
            mTextNight.setText("" + mNetworkInfo.getExtraInfo());
            //網路出錯時的原因回報:
            mNetworkInfo.getReason();
            mTextTen.setText("" + mNetworkInfo.getReason());
            mWebView.loadUrl("http://nikeru8.blogspot.tw/");
        } else {
            new AlertDialog.Builder(this).setMessage("沒有網路")
                    .setPositiveButton("前往設定網路", new DialogInterface.OnClickListener() {
                        @Override
                        public void onClick(DialogInterface dialogInterface, int i) {
                            Intent callNetSettingIntent = new Intent(
                                    android.provider.Settings.ACTION_NETWORK_OPERATOR_SETTINGS);
                            Toast.makeText(context, "請前往開啟網路", Toast.LENGTH_LONG).show();
                            startActivity(callNetSettingIntent);
                        }
                    })
                    .show();

        }
    }
}


Demo:

https://drive.google.com/open?id=0Byk75IYx-dKXaW1DT0NQWE03Tnc

影片中的Dialog請參考朝狀結構篇:
http://nikeru8.blogspot.tw/2016/07/androiddialog-button.html
影片中WebView:
http://nikeru8.blogspot.tw/2017/03/android.html

Android元件 ─ EditText和TextView連動

前言:

效果如下


EditText和TextView的連動,可以運用在很多地方!
分享給你們。


實作 :

1、先在xml做出TextView和EditText
2、在MainActivity.java內指定上述兩個東西的元件(findViewById)
3、EditText此次的重點程式碼:
 mEdit.addTextChangedListener(new TextWatcher() {
            @Override
            public void beforeTextChanged(CharSequence charSequence, int i, int i1, int i2) {
                 //do something
            }

            @Override
            public void onTextChanged(CharSequence charSequence, int i, int i1, int i2) {
                //do something               
             mText.setText(charSequence);
             }

            @Override
            public void afterTextChanged(Editable editable) {
               //do something
            }
        });


/**TextWatcher
*

*beforeTextChanged 在edit改變之前要做的事情

*onTextChanged  在edit改變中要做的事情

*afterTextChanged 在edit改變後要做的事情

*/

我們要改動的就是改變中的這個變數!


整程式碼:


activity_main.xml

<?xml version="1.0" encoding="utf-8"?>
<RelativeLayout xmlns:android="http://schemas.android.com/apk/res/android"
    xmlns:tools="http://schemas.android.com/tools"
    android:id="@+id/activity_main"
    android:layout_width="match_parent"
    android:layout_height="match_parent"

    android:paddingTop="5dp"
    tools:context="com.chat.a015865.playedit.MainActivity">

    <TextView
        android:id="@+id/show_text"
        android:layout_width="match_parent"
        android:layout_height="wrap_content"
        android:layout_alignParentTop="true"
        android:gravity="center"
        android:padding="20dp"
        android:text="Content" />

    <EditText
        android:id="@+id/show_edit"
        android:layout_width="match_parent"
        android:layout_height="wrap_content"
        android:layout_below="@+id/show_text"
        android:layout_centerInParent="true"
        android:hint="TypeSomething" />
</RelativeLayout>

MainActivity.java

public class MainActivity extends AppCompatActivity {

    private EditText mEdit;
    private TextView mText;

    @Override
    protected void onCreate(Bundle savedInstanceState) {
        super.onCreate(savedInstanceState);
        setContentView(R.layout.activity_main);

        mEdit = (EditText) findViewById(R.id.show_edit);
        mText = (TextView) findViewById(R.id.show_text);

        mEdit.addTextChangedListener(new TextWatcher() {
            @Override
            public void beforeTextChanged(CharSequence charSequence, int i, int i1, int i2) {

            }

            @Override
            public void onTextChanged(CharSequence charSequence, int i, int i1, int i2) {
                mText.setText(charSequence);
            }

            @Override
            public void afterTextChanged(Editable editable) {

            }
        });
    }
}


Demo:


影片中的TextView邊框在這:http://nikeru8.blogspot.tw/2017/03/textview.html


TextView自訂邊框(按鈕美化) ─ 繪圖圖形資源

前言:

這是美化Button的一種做法。
當完成之後你的Button會長這樣。

很不錯吧!


實作:


在drawable內創建一個檔案。 res/drawable/xxxx  
取名為outside


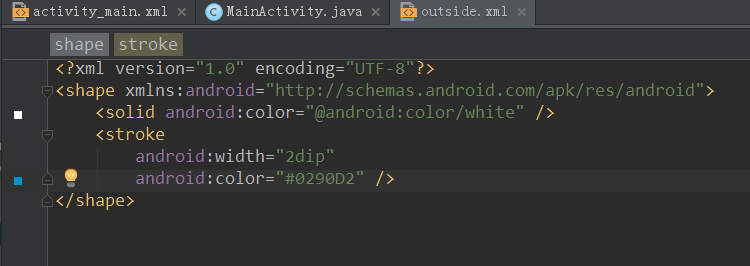
檔案內:

英文補給站 >

solid 固體 (這邊代表代表內部的顏色)
stroke 線 (繪畫等)一筆 (這邊就代表外框) 


Eidt(2017/03/29)
 找到一個很棒的解說。
這個繪圖圖形資源檔案的內容,最外層是「shape」標籤,標籤中的「android:shape」設定決定繪圖的種類,可以設定為下列這些設定值:

●Retangle – 繪製矩形,可以搭配「corners」標籤設定四邊的圓角。

●Oval – 繪製橢圓形。

●Line – 繪製線條。

●Ring – 繪製圓環,在shape標籤中控制繪製的效果。

●你可以使用繪圖圖形資源,為畫面元件設定一個特殊的樣式。


之後再<TextView 內加入background就完成了!


完整程式碼:

MainActivity.java 完全不用做更動

public class MainActivity extends AppCompatActivity {
    @Override
    protected void onCreate(Bundle savedInstanceState) {
        super.onCreate(savedInstanceState);
        setContentView(R.layout.activity_main);
    }
}


outside.xml (res/drawable/outside.xml)

<?xml version="1.0" encoding="UTF-8"?>
<shape xmlns:android="http://schemas.android.com/apk/res/android">
    <solid android:color="@android:color/white" />
    <stroke
        android:width="2dip"
        android:color="#0290D2" />
</shape>


activity_main.xml

<?xml version="1.0" encoding="utf-8"?>
<RelativeLayout xmlns:android="http://schemas.android.com/apk/res/android"
    xmlns:tools="http://schemas.android.com/tools"
    android:id="@+id/activity_main"
    android:layout_width="match_parent"
    android:layout_height="match_parent"
    android:paddingBottom="@dimen/activity_vertical_margin"
    android:paddingLeft="@dimen/activity_horizontal_margin"
    android:paddingRight="@dimen/activity_horizontal_margin"
    android:paddingTop="@dimen/activity_vertical_margin"
    tools:context="com.chat.a015865.playedit.MainActivity">

    <TextView
    android:layout_centerInParent="true"
        android:layout_width="wrap_content"
        android:layout_height="wrap_content"
        android:background="@drawable/outside"
        android:gravity="center"
        android:padding="20dp"
        android:text="Button" />
</RelativeLayout>


2017年2月17日 星期五

Android元件:SharedPreferences ─ 儲存資料的好幫手


今日時做影片:


主要程式碼:
SharedPreferences sharedPreferences = getSharedPreferences(String name, int mode);

String name:是你要儲存在手機內的檔案名稱。
Int mode:是你儲存的方式,通常都是使用MODE_PRIVATE(除了你這個app其他app不能使用)

各種MODE
Sr.No
Mode & description
1
MODE_APPEND
This will append the new preferences with the already existing preferences
2
MODE_ENABLE_WRITE_AHEAD_LOGGING
Database open flag. When it is set , it would enable write ahead logging by default
3
MODE_MULTI_PROCESS
This method will check for modification of preferences even if the sharedpreference instance has already been loaded
4
MODE_PRIVATE
By setting this mode, the file can only be accessed using calling application
5
MODE_WORLD_READABLE
This mode allow other application to read the preferences
6
MODE_WORLD_WRITEABLE
This mode allow other application to write the preferences


儲存方式:
SharedPreferences sharedPreferences = getSharedPreferences(data, MODE_PRIVATE);

假設你在EditText內打了一串東西想之後打開app之後還留存。


sharedPreferences.edit()
     .putString(“I_WANT_TO_SAVE_EDIT”, OneEdit.getText().toString())
     .apply();

呼叫sharedPreferences在後面加一個eidt()  (英文大補帖: edit 編輯 )
仔使用putstring 加入你要處存的東西
apply 使它生效(英文大補帖: apply  始生效 )
這就存起來了。
它會存在叫“I_WANT_TO_SAVE_EDIT”的檔案內。

讀取方式:


OneEdit.setText(sharedPreferences.getString(“I_WANT_TO_SAVE_EDIT”, ""));


同場加映

固定Switch開關的問題。

當我讓SWITCH開關成開啟狀態,當下次開啟APP時,要如何保持在開啟狀態呢?


當然是先在xml 內畫一個 switchButton


activity_main.xml
  <Switch
        android:id="@+id/switch_button"
        android:layout_marginTop="10dp"
        android:layout_width="wrap_content"
        android:layout_height="wrap_content"
        android:layout_gravity="center_horizontal" />

MainActivity.java

先設定元件
private Switch switch_buton;

指定給xml
switch_buton = (Switch) findViewById(R.id.switch_button);

設定SwitchButton的點擊方式

 switch_buton.setOnClickListener(new View.OnClickListener() {
            @Override
            public void onClick(View view) {
                if (switch_buton.isChecked()) {
                    //如果SwitchButton開啟 do something

                    //儲存
                    sharedPreferences.edit().putBoolean(switchField, true).apply();
                    Log.d(handle, "onClick isChecked switchField= is Open");
                } else {
                    //如果SwitchButton關閉 do something

                    //儲存
                    sharedPreferences.edit().putBoolean(switchField, false).apply();
                    Log.d(handle, "onClick isClosed switchField= is Closed");
                }
            }
        });

然後再OnCreate的地方丟入,這行是指你開啟APP時,讀取你存在sharedPreferences內的SWITCH 狀態。
switch_buton.setChecked(sharedPreferences.getBoolean(switchField, false));

這樣SwitchButton就可以正常開關囉!


完整程式碼:
activity_main.xml
<?xml version="1.0" encoding="utf-8"?>
<LinearLayout xmlns:android="http://schemas.android.com/apk/res/android"
    xmlns:tools="http://schemas.android.com/tools"
    android:id="@+id/activity_main"
    android:layout_width="match_parent"
    android:layout_height="match_parent"
    android:orientation="vertical"
    tools:context="com.chat.a015865.sharedpreferences.MainActivity">

    <TextView
        android:layout_width="fill_parent"
        android:layout_height="wrap_content"
        android:text="1" />

    <EditText
        android:id="@+id/oneField"
        android:layout_width="fill_parent"
        android:layout_height="wrap_content"
      />

    <TextView
        android:layout_width="fill_parent"
        android:layout_height="wrap_content"
        android:text="2" />

    <EditText
        android:id="@+id/twoField"
        android:layout_width="fill_parent"
        android:layout_height="wrap_content"
       />

    <TextView
        android:layout_width="fill_parent"
        android:layout_height="wrap_content"
        android:text="3" />

    <EditText
        android:id="@+id/threeField"
        android:layout_width="fill_parent"
        android:layout_height="wrap_content"
       />

    <Switch
        android:id="@+id/switch_button"
        android:layout_marginTop="10dp"
        android:layout_width="wrap_content"
        android:layout_height="wrap_content"
        android:layout_gravity="center_horizontal" />

    <Button
        android:id="@+id/close_button"
        android:text="關閉app"
        android:layout_width="wrap_content"
        android:layout_height="wrap_content" />
</LinearLayout>


MainActivity.java
public class MainActivity extends AppCompatActivity {

    private static final String handle = MainActivity.class.getSimpleName();

    private EditText OneEdit, TWO, THREE;
    private Context context;
    private Button close_Button;
    private Activity activity;

    private SharedPreferences sharedPreferences;
    private static final String data = "DATA";
    private static final String helloField = "ONE_STATE";
    private static final String twoField = "TWO_STATE";
    private static final String threeField = "THREE_SATE";
    private static final String switchField = "SWITCH_STATE";

    private Switch switch_buton;

    @Override
    protected void onCreate(Bundle savedInstanceState) {
        super.onCreate(savedInstanceState);
        setContentView(R.layout.activity_main);
        context = this;
        activity = this;
        initView();
        initSet();
        readData();//讀取
    }

    private void initView() {
        close_Button = (Button) findViewById(R.id.close_button);
        sharedPreferences = getSharedPreferences(data, MODE_PRIVATE);
        switch_buton = (Switch) findViewById(R.id.switch_button);
        OneEdit = (EditText) findViewById(R.id.oneField);
        TWO = (EditText) findViewById(R.id.twoField);
        THREE = (EditText) findViewById(R.id.threeField);
    }

    private void initSet() {
        switch_buton.setOnClickListener(new View.OnClickListener() {
            @Override
            public void onClick(View view) {
                if (switch_buton.isChecked()) {
                    //如果SwitchButton開啟 do something

                    //儲存
                    sharedPreferences.edit().putBoolean(switchField, true).apply();
                    Log.d(handle, "onClick isChecked switchField= is Open");
                } else {
                    //如果SwitchButton關閉 do something

                    //儲存
                    sharedPreferences.edit().putBoolean(switchField, false).apply();
                    Log.d(handle, "onClick isClosed switchField= is Closed");
                }
            }
        });

        close_Button.setOnClickListener(new View.OnClickListener() {
            @Override
            public void onClick(View view) {
                finish();
            }
        });
    }

    public void readData() {//讀取
        switch_buton.setChecked(sharedPreferences.getBoolean(switchField, false));
        OneEdit.setText(sharedPreferences.getString(helloField, ""));
        TWO.setText(sharedPreferences.getString(twoField, ""));
        THREE.setText(sharedPreferences.getString(threeField, ""));
    }

    public void saveData() {//儲存
        sharedPreferences.edit()
                .putString(helloField, OneEdit.getText().toString())
                .putString(twoField, TWO.getText().toString())
                .putString(threeField, THREE.getText().toString())
                .apply();
    }


    @Override
    protected void onPause() {
        super.onPause();
        Log.d(handle, "onPause()");
        saveData();
    }

    @Override
    protected void onStop() {
        super.onStop();
        Log.d(handle, "onStop()");
        saveData();
    }

    @Override
    protected void onDestroy() {
        super.onDestroy();
        Log.d(handle, "onDestroy()");
        saveData();
    }
}


Demo下載:
https://drive.google.com/open?id=0Byk75IYx-dKXMDZZcHFHY3U4SXc
有問題請發問囉!


協程(coroutine) - 協程為什麼要學它?

 Coroutine 協程 再強調一次 協程就是由kotlin官方所提供的線程api //Thread Thread { }.start() //Executor val execu...